We’ve all had them – the riding instructors that yell, harangue and nag. In 1975 I went to riding school in England. Gerry was one of my instructors. He was tough and wiry and had legs like nutcrackers. He could sit on anything. He pushed me hard to improve. Modern day eventing and dressage evolved from the cavalry, and Gerry’s instructional style was in direct lineage from military boot camp. You look like my grandmother’s dishrag! he’d shout at me. In truth, I did. I tried harder. My riding improved. The yelling was intertwined with the teaching, and the teaching got results, so the verbal abuse was accepted.
It is a tradition that riders learn via apprenticeships. You go into it knowing that your chosen sport is physically and mentally hard and that you have to learn by doing, from someone who’s already paid their dues. It’s part of the culture that you put up with anything that your instructor throws at you because that’s what you believe it takes to learn. (I’m sure there are plenty of other sports like this. American football comes to mind.) Gerry heaped scorn on me, but I kept my mouth shut and listened. He knew horses in a way that few can hope to achieve. The following year, Gerry rode in the Montreal Olympics. He placed sixth in eventing. I was learning from the best, and I was grateful for the opportunity.

1975, The Talland School, Terry on Shady Lady
But was it the yelling that made me a better rider? Or did I improve despite it?
When I was in my thirties, I took a break from horses. I had babies. I was going deaf. I had issues with my back and my shoulder. But I missed the horses tremendously and found ways to ride now and then. I found a Grand Prix rider willing to give me lessons on one of her horses. When she moved away, I found another. When that trainer went to Florida for the winter, her assistant took over my lessons. She yelled at me to sit up. I tried, but, physically and emotionally, I’d hit my limit. I was no longer a teenager with aspirations of big-time competition. I just wanted to ride in sync with the horse. I halted. I told her that her yelling wasn’t making me ride any better. She said that’s how she teaches. At this point in my life I knew that it didn’t have to be this way. The lesson, and my time at that barn, was over. I no longer had a tolerance for the culture of verbal abuse because in those intervening years I had discovered Karen Pryor’s books, behavioral science, and how effective training with positive reinforcement is. I’d learned that it is not only nicer not to be yelled at, but that punishment (both emotional and physical) has long-lasting and negative side-effects.
When some of my back issues eased, and I could hear again thanks to cochlear implants, I bought Tonka with the thought that we’d do relaxed trail rides. No ring work. No lessons. But as well-behaved as he was, the dressage rider in me could feel that Tonka was physically imbalanced. In order to carry me soundly for years, he needed to do exercises to build muscles across his top line, and that would entail more than lazy walks through the woods. When I picked up the reins and began that work, I realized that our communication was dull. The thrill of dressage for me had always been that fine-tuning of communication and the flow back and forth between rider and horse. I wanted that with Tonka, so that, for example, a small shift in my weight in a sitting bone would cue him in to the direction, and even the speed, to go. I started dressage with Tonka, and although I knew what I was doing, it’s an endeavor done best when there’s a coach on the ground, and so I resumed riding lessons, again with a Grand Prix rider, Kim Litwinczak. I work with her because not only does she have a great eye and a kind manner, but she is willing to take my clicker and mark the good moments, and let me treat Tonka with cookies.
I also resumed teaching riding. Here was my chance to do it differently. In clicker training you break down behaviors into the smallest pieces, and build up from success to success. You mark the moment that a slice of behavior is done correctly, usually with an audible sound, and then you reward. With animals, the reward is often a bit of food. For a human student, who has the same goal as their coach, the knowledge that they’ve achieved a perfect moment is their reward, and a potent one at that. TAGteach International has codified this into a system which is effective for a wide range of clients, from people with autism, to the corporate world. I’ve taken ideas from TAGteach, and what I know from clicker training, and I’m applying it to working with my students. It’s an amalgam. Some of my students I see only once a month. The horses and their owners are not in the R+ (positive reinforcement) world, but they’re grateful to be given a view of it when working with me. How to help these animals and people when they’re not fully R+ is another post – there are ways to do it! But for this post I want to show how to teach correct hand position in only a few lessons and without nagging.
Hand position is important. The reins attach to the bit (we can discuss bitless bridles at another time, but what I say here applies to them, too.) A slight shift in tension, height, and movement of the hands is felt by the horse. When ridden with harsh or insensitive hands, horses clamp their mouths and deaden themselves to the input. It’s like having a door shut in your face by your horse. But when that line of communication is open, when you hold your hands quietly, just so, you can engage in a full dialog. For example, you can ask your horse for something subtle, like lift your right shoulder and look right. You ask this by closing your right pinky and bringing your hand up a half-inch, and your horse responds! But if your hands are too high, uneven, busy, and tense to start with, you won’t have that subtle and willing response from your horse.
Riding instructors yell hands down! and thumbs up! and shorten your reins! Eventually, maybe, the rider improves. What’s far more effective is to break down how the reins are held into the smallest of components, get each right, and build up to the final, correct position. I’ve been doing this with my student, Susan.
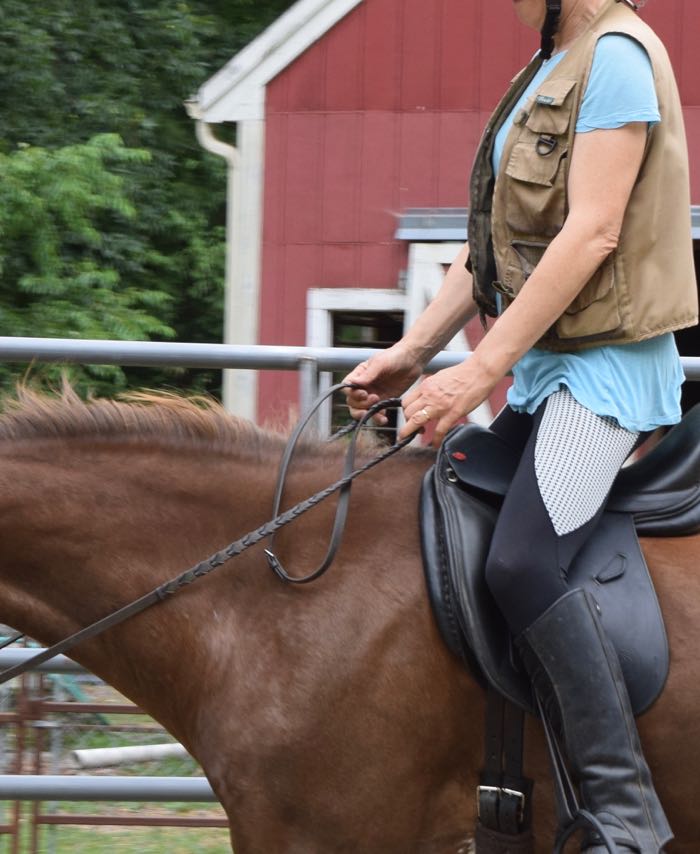
Susan has a habit of raising her outside hand and pulling on the inside rein, especially when she wants her horse to move forward. She also keeps her fingers open, so the reins slip too long (an uneven connection is harder on the horse than a light steady contact), and her thumbs turn in and her elbows jut out.
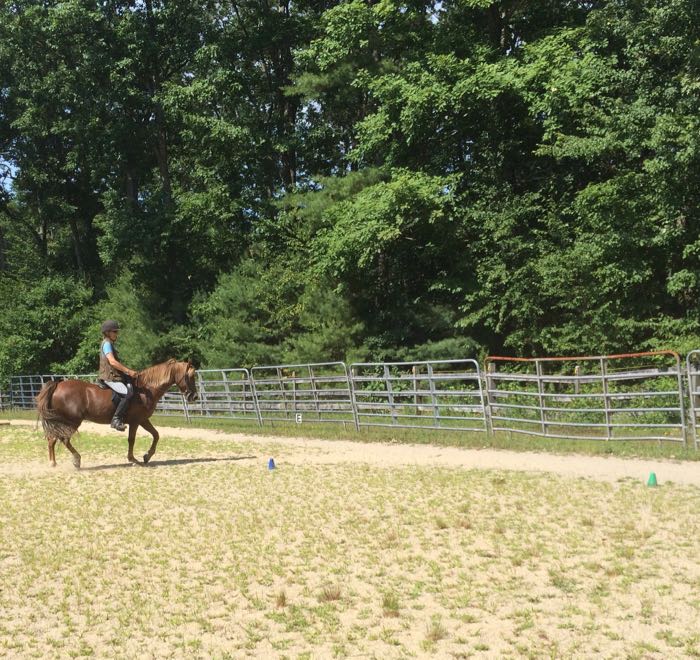
That seems like a lot to fix. I tried saying “thumbs up” (in a nice way, no yelling) and saying DEE! as the marker when the thumbs turned skyward but that improved hand position just didn’t stick. I’d say, “thumbs up” again and again. Even with the DEE, I was nagging. Susan shared something that she had learned from Jane Jackson at Bookends Farm – to set up cones and to “click” if, as she passed one, she had achieved the set goal (we call these “tag points”.) Susan learns best by doing not listening. In this way. I could tell her what piece we were working on, and then shut up. If, as she passed by a cone, she achieved the tag point, I’d mark it with a DEE. (I can’t use a clicker, as her horse is clicker savvy and he’d think it was for him. I’m looking for a unique noise maker but for now I’m using the verbal marker.)
If I didn’t say DEE, then Susan would assess what she was doing. It was like there was a snapshot at each cone, she could “see” it with her body, and know how to fix it without me saying anything. (That said, if she passed another cone and she hadn’t gotten it I might remind her of a tag point such as “wide hands” or whatever else she needed to work on. What I don’t want is for the student to get frustrated. Going around and around without a positive reinforcement is as frustrating for the rider as the horse.)
This method only works when the task is broken down into components. You might be surprised at how something as seemingly simple as holding the reins is actually a behavior that is made of many steps, best built one on the other in a specific way. This is the first one:
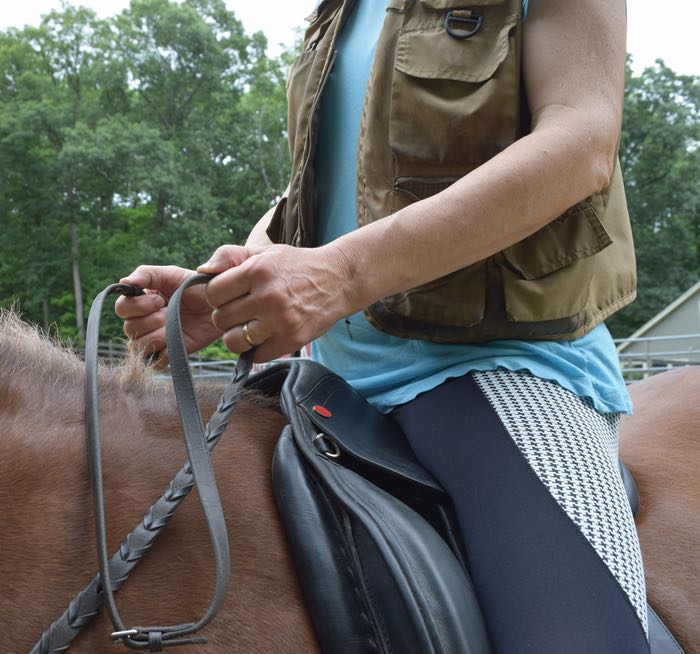
Parallel hands.

If Susan rode by a cone and her hands looked like this:
I didn’t say anything. She’d self-correct, and at the next cone, she’d hear the DEE. I didn’t care what else those hands were doing. Keeping them parallel was all that mattered.
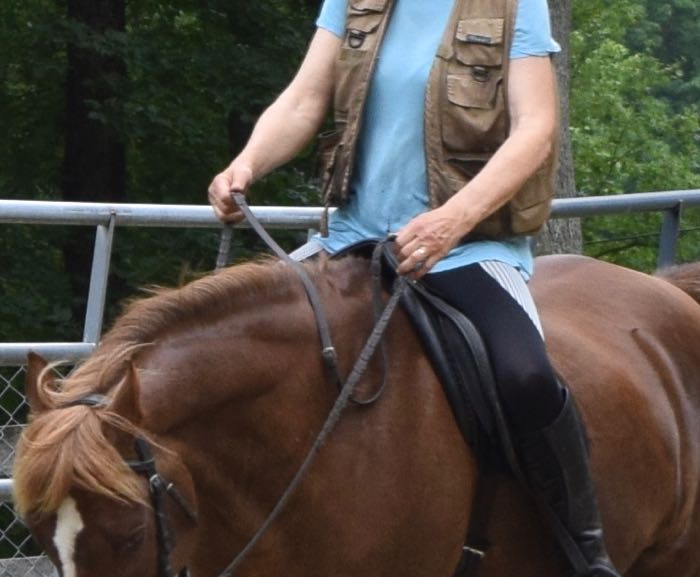
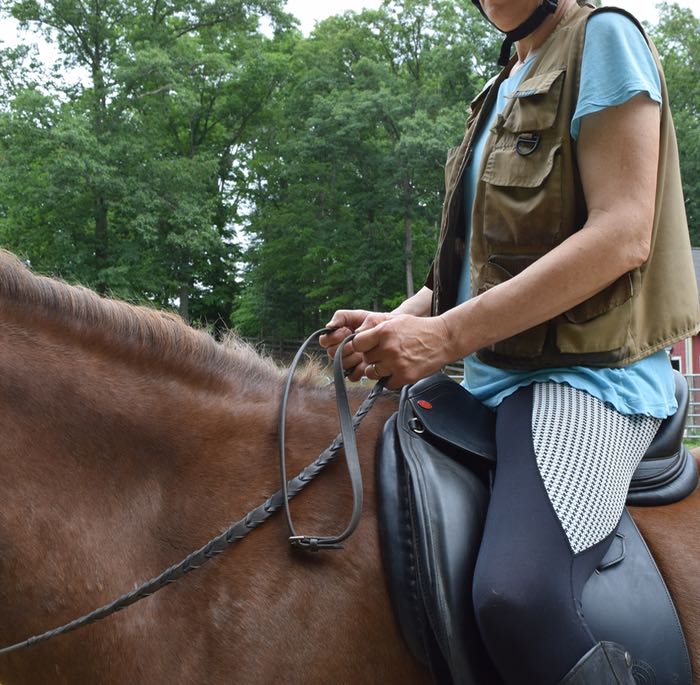
Very quickly, those hands were staying parallel. Next was “thumbs up.”
Then I added “press thumbs.” Holding thumbs pressed and bent like this keeps the reins from slipping and allows you to do subtle communication with the other fingers.
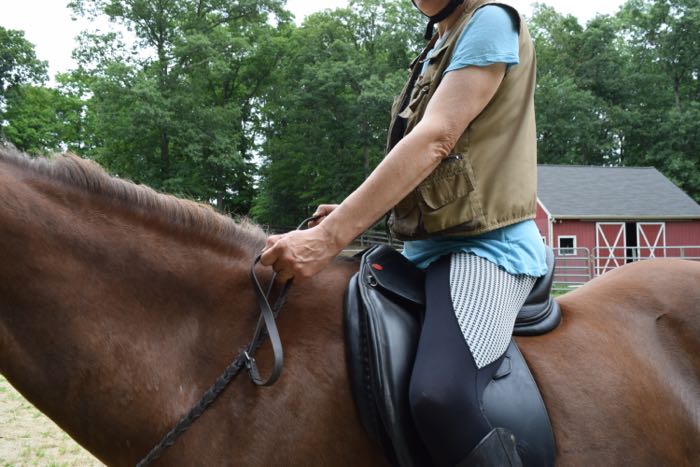
The next piece to add was “elbows at hips.” Wide elbows make the hands less effective. Susan prefers the image “elbows at stomach” so that’s what I say for her.
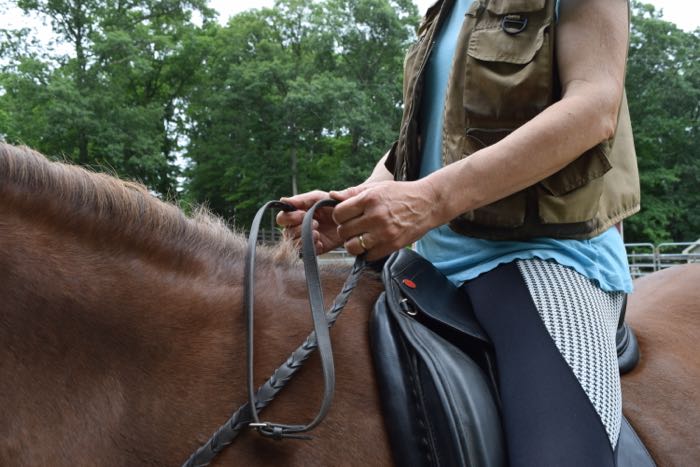
This position is more effective, because when you want to allow the horse to stretch their neck, you give from your shoulder and elbow joints, not by letting the reins slip through your fingers. This is more difficult than it sounds! With riding, each part of your body has to move independently of the others. Try moving your shoulder, but remaining upright. It’s hard. To practice, I had Susan do “hand to shoulder.” At each cone that she moved correctly she heard a DEE.
If a component of this hand position fell apart, I’d ask Susan to go through her mental checklist: Parallel, thumbs up, press, etc. She was able to correct her position without my nagging and I was able to say DEE! and DEE! again at the next cone.
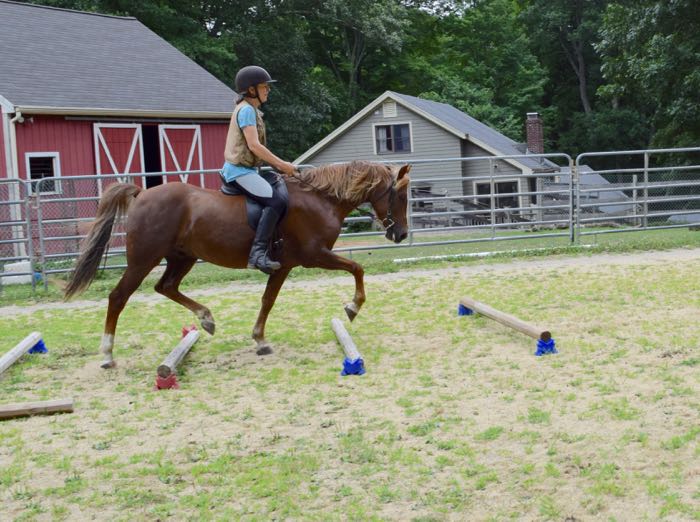
The beauty of this method is that the rider takes ownership of her position. She self-corrects. She gets immediate feedback for when it’s right, can feel that moment and internalize it so that it’s repeatable. In only a couple of sessions of doing this, Susan is now riding like this:
It’s quite hard to learn how to carry oneself differently. Doing it the way I describe here, though, is effective and enjoyable for horse and rider. It’s enjoyable for this instructor, too!
I’d love it if this culture of positively getting to yes spread through the horse world. If you’d like to see this in your barn, contact me. I teach throughout New England and happily travel further to do clinics. If you liked this article, please share on social media. Thank you!
Note: Susan deserves a big thanks for letting me use all of these photographs, even the unflattering ones. I’m very proud of her and Hayden!

A very big thank you for a fantastic blog. I will get Jess to read and digest your instructions to make sure she is holding her reins properly. Everything that is done with patience and kindness is always far more rewarding…:)
This world could use more patience and kindness!
Like you, Terry, I’ve had some fantastic coaches and teachers and some whose methods were pretty brutal. On the empathetic side, the coach I had the longest (the lovely woman who was always encouraging me to “apologize to your mare” whenever we were unsuccessful) did much of what you do by breaking things down into simple, small steps. Most important, she helped me to truly understand the cause and effect of my actions in the simplest and most straightforward ways. For example, she showed me what a metal bit in an animal’s mouth really ‘meant’ by having me ride with reins replaced by the black saddler’s thread: incredibly strong when pressure and release was done gradually, and snapped immediately when yanked or pulled too sharply. I had always prided myself on my quiet hands, yet I broke my thread reins three times in the first ten minutes of the lesson. (It was mortifying.) Trotting and cantering through an ‘obstacle course’ of sorts, including fences, quickly taught me that the thread reins lasted longest when I used ALL of my contact points to help my horse understand and execute what I wanted, so rein pressure wasn’t the only conversation going on. Engaging one’s seat, weight shifts, ridigity of back, shoulder position, feet and legs, etc. –even a light hand on the horse’s neck– all made the reins just one instrument in the orchestra. And all of it required listening very, very hard. I have very quiet hands to this day because I simply understand there is a MOUTH on the other end.
I had another Austrian, Olympic medaled coach who had incredible (amazing, really) aim with the tip of a lunge whip. I’d get a sharp crack in the small of my back if my upper body position was off. I corrected, but I didn’t really learn. He was a brilliant rider, taught me so much about the physiology of horses –how they see, perceive, move, stop, turn, balance, respond, etc.– but he was not a good riding coach in saddle.
I firmly believe that at least half of a rider’s education takes place on the ground, out of saddle, understanding how these animals navigate through the world. To learn to diagnose, and speak their language as best as we can. And, as you have mentioned many times, to forge a relationship –even a friendship– with them. And if you’re really good at it, maybe a partnership.
After the horses themselves, my best teachers have been ones like you. I’m jealous of your students.
I think I might fail that thread test! I am currently working hard to get myself to apply all of my other aids first, before I do anything with my hands. Not easy. I agree that there’s always something to learn, even from the punishing coaches. But think how much more we’d improve if only we weren’t figuratively or literally flicked with that whip.
I wish to find a tag teacher for agility with my dog. We click the dog, but I’ve never had an instructor that would tag the human.
If I go back to riding I’d love to have someone teach me dressage the way you are teaching. Thanks for sharing. I managed up to 1st level riding other peoples horses in the past. Perhaps if I get my own horse…
I so enjoyed dog agility. It’s where I discovered clicker training. It did surprise me that trainers who said that I wasn’t allowed to say “no” to my dog, yelled at me More and more clicker trainers are discovering TagTeach and figuring out how to apply it to their students. I hope that you find someone!
This is really, really useful Terry: thank you! I have just discovered your blog. In this post, the specific steps and the photos are particularly useful. I’ve had a lifetime in teaching humans, using the approach you describe – clear steps, clear encouragement and rewards, active learner involvement etc. I’ve rarely managed to translate that framework to my own experience in learning to ride (and this isn’t a complaint about a lack of ‘good’ instructors, it’s more a reflection on my own need for increased awareness about the options). I’m just about to try clicker training with the horse I’ve owned for two years; being a first-time owner in my 60s is proving to be an interesting and rewarding journey.